I'm pretty into birthdays. I start thinking of themes and decorations sort of ridiculously far in advance, and create a new Pinterest board every time I get an idea for a possibly party theme.
And usually, the idea starts with the cake. It's the centerpiece. I always have to decide on the cake first, and then everything else falls into place.
I admit, I make a big deal of the cake. It's what I spend the most time on, and it generally takes some overnight prep plus some time the following morning on the day of the party to finish. In case any of you have thought about doing your own homemade cakes but have no idea where to start, or think it's entirely too difficult, I thought I'd throw out a few tips I've learned along the way.
1. I use
Cake Central and
Pinterest to get ideas for cakes. Quick searches on either of these sites will turn up hundreds of different cake ideas.
2. Never use store-bought frosting to decorate cakes. It's not stiff enough and it won't hold its shape. I use
Wilton's buttercream icing recipe, and add whatever coloring I want.
3. You will ALWAYS need more icing than you think. It takes me at least two batches to cover a cake. (Thank goodness the recipe is super easy to throw together.)
4. Invest in Viva paper towels. When you're finished frosting your cake, lay the paper towel over the icing and rub your hands over it. I never cover a cake in fondant--I think you have to be very talented to pull that off. This Viva method will give the icing a smooth, polished look without the fondant. (Other brands of paper towels WON'T work. They'll just stick to the icing. Don't bother trying. I made the mistake so you won't have to.)
5. I DO use fondant a lot to add little accents. I always use the store-bought kind. It tastes awful, but I just warn everyone not to eat it. I use a roller to flatten the fondant out (thin enough so it will harden quickly) then cut out whatever shapes I want. I usually do this the night before so the next day they will be hard enough to stick to the cake.
6. Be creative. When you see a cake you want to try to copy, you don't necessarily have to use all the same products and ingredients a professional would use. (I'll show you some substitutions I've made in the pictures below!)
The cakes are definitely time-consuming, but they're not difficult. If you like this sort of thing, it can be fun to find a cake you like and figure out an easy way to make it yourself. Below are some cakes I've made over the years, and quick explanations of how I put them together! Good luck! Feel free to leave questions in the comments!
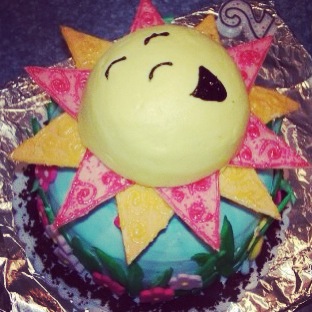
You Are My Sunshine
Three 9-in round cakes make the bottom layer and two six-in round cakes for the middle layer. The sun was made using one of those "ball" cake pans you can find at Michaels.
Those sunbeams? The original called for triangles made from royal icing. I tried and failed. I cut a tortilla into triangles and baked them, then covered them with sugar and store-bought gel icing.
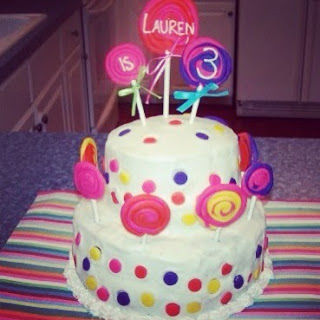
Candy Shop
The cake itself is the same as the sun, with two 6-in and two 9-in cakes making up the layers.
Flatten the fondant and cut it into strips, then roll them between your fingers to create long rounded pieces. Shape those into spirals for the lollipops, then stick lollipop sticks in them.
*The lollipops were REALLY heavy. To make them stay upright, I cut straws in half and slid them down into the cake, then slid the lollipops in the straws.
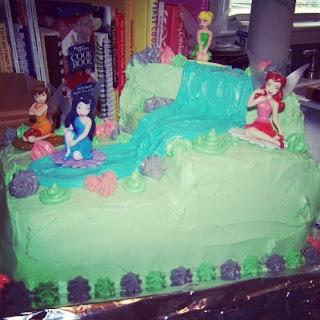
Fairies
I found the fairy figurines a
Disney fairy cake kit on Amazon. See the cake in the advertisement? I decided to recreate it.
Stack two 9x13 cakes for the bottom layer. Cut another 9x13 cake in half and stack the halves for the middle layer. The top layer is a triangle cut from another 9x13 cake. (I MAY have eaten the rest of that cake while I iced this one. Maybe. Probably.)
The rest of the decorations are made from buttercream icing using a cake decorating tube set (similar to
this).
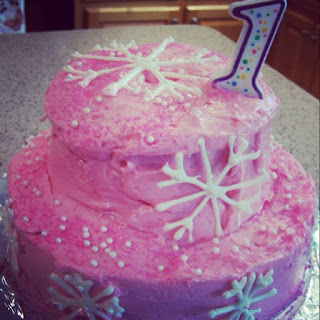
Snowflake
This cake was super simple, because it's just the same basic cake as the Sunshine and Lollipop cakes. I made the snowflakes out of white chocolate. Melt the chocolate and pipe it onto wax paper in whatever shape you want, then let it dry. Stick it to the cake using icing as glue!
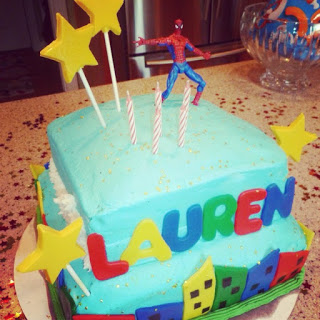
Superhero Party
Aside from my usual fondant accents, I branched out with this one and made star lollipops using a
candy mold I found at Hobby Lobby. I'd always avoided candy molds because it just sounded like too much to get into, but this was ridiculously easy.
Melt the candy pieces (they sell them right next to the molds). Pour the melted candy into the mold. Add the lollipop sticks. Go eat spoonfuls of buttercream icing and marvel at your own brilliance while you wait for them to harden. (This would've been SO MUCH EASIER for that lollipop cake than the super heavy fondant.)
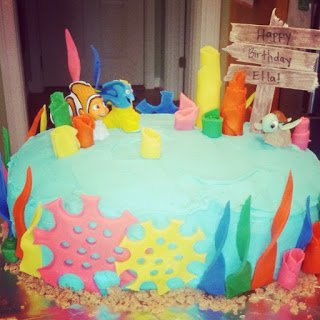
Finding Nemo
This was the easiest cake I've made yet. Stack two 9x13 cakes on top of each other, then cut off the corners to create an oval shape.
I bent craft sticks until they broke to give the jagged edges of the sign, and glued all that together. The "sand" around the bottom is brown sugar. All the decorations are made from fondant, aside from the figurines, which I
found on Amazon.